
A roof inspection checklist is one of the simplest ways to protect a home. Most roof problems start small. A cracked shingle, a loose piece of flashing, or a gutter full of leaves may look harmless at first. However, left alone, that small problem can let water into the attic, the walls, and the ceilings below. In short, a regular check can save a homeowner from a much larger repair later.
This guide is practical and US-focused. It explains when to inspect, what to check safely from the ground and from a ladder, what belongs in a full roof inspection checklist, and when it is smarter to call a professional roofer. It also covers approximate costs, so you can plan without surprises.
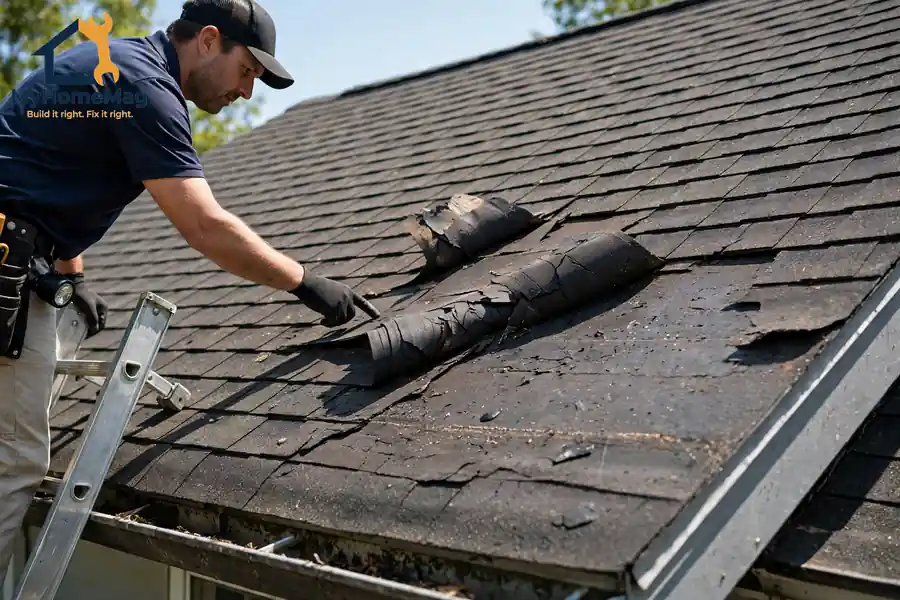
Why a Roof Inspection Matters
A roof does more than keep rain out. It protects the structure, the insulation, and everything inside the home. It also works with gutters, flashing, and ventilation to move water away from the house and to control moisture in the attic.
When to Inspect Your Roof
The best schedule is simple: inspect twice a year, in spring and in fall, and after any major storm. Spring checks reveal winter damage, such as ice dams, cracked shingles, and loose flashing. Fall checks prepare the roof for winter, when small leaks can turn into ice and water damage.
After a storm, do a quick visual check as soon as it is safe. Look for missing shingles, fallen branches, damaged gutters, and debris on the roof. However, do not climb onto a wet, icy, or wind-damaged roof. A ground-level check, plus a look in the attic, is safer and often enough to decide whether a professional is needed.
Safety First: What Not to Do
Safety comes before any checklist item. Roofs are steep, slippery, and higher than they look, and falls are a leading cause of serious home injuries.
- Do not walk a steep, wet, icy, or damaged roof. If you are unsure about the slope or the surface, stay on the ground.
- Use a stable ladder, on level ground, with someone nearby. Keep three points of contact, and never lean sideways to reach a spot.
- Do not work near power lines. Keep ladders, tools, and your body well clear of overhead lines.
- Wear sturdy shoes, gloves, and eye protection. Loose clothing and smooth soles increase the risk of a slip.
- Stop if you feel unsafe, dizzy, or unsteady. No checklist item is worth a fall.
- Leave structural work to a professional. Sagging, soft spots, and rotted decking are warning signs, not DIY repairs.
The Roof Inspection Checklist at a Glance
Use this table as your core roof inspection checklist. Work through it in order, and note anything that looks damaged, worn, or out of place.
| Area to check | What to look for | Why it matters |
|---|---|---|
| Roof surface and shingles | Missing, cracked, curled, or lifted shingles; bald spots where granules are gone; moss or algae growth | Damaged shingles let water under the roof covering |
| Flashing | Loose, rusted, bent, or missing flashing around chimneys, vents, skylights, and valleys | Flashing seals joints where leaks most often start |
| Gutters and downspouts | Sagging, leaks, rust, clogs, and downspouts that do not drain away from the house | Blocked gutters send water back toward the roof and foundation |
| Attic and ceilings | Water stains, damp insulation, daylight through the roof, mold, or a musty smell | Attic signs often reveal a leak before it shows inside |
| Ventilation and soffits | Blocked vents, damaged soffits, and signs of trapped heat or moisture in the attic | Poor ventilation shortens roof life and encourages mold |
| Chimney, vents, and skylights | Cracked mortar, loose caps, damaged seals, and fogging or leaks around skylights | These penetrations are common leak points |
| Trees and debris | Branches touching the roof, leaves piled in valleys, and debris behind chimneys | Debris traps moisture and damages shingles over time |
Check 1: The Roof Surface and Shingles
Start from the ground, and walk slowly around the house. Look at the roof from several angles, because damage on one slope may not be visible from another. Use binoculars if you have them; they make it much easier to see shingle condition without climbing.
Look for shingles that are missing, cracked, curled at the edges, or lifted by wind. Also look for dark patches where granules have worn away, and for shingles that look uneven or buckled. For example, a single missing shingle after a storm is a common, fixable problem, but several missing shingles in one area may point to wider wear or poor installation.
Check valleys, where two roof slopes meet, because water concentrates there. Debris in a valley can trap moisture and rot the shingles underneath. Moreover, look for moss, algae, or lichen, especially on shaded, north-facing slopes. Light algae staining is often cosmetic, but thick moss can lift shingles and hold moisture against the roof.
If you see a large area of damage, sagging, or softness, do not try to repair it yourself. Note the location, take a photo, and call a roofer for a closer inspection.
Check 2: Flashing Around Chimneys, Vents, and Valleys
Flashing is the metal that seals the joints where the roof meets a wall, a chimney, a vent, or a skylight. It is one of the most important parts of a roof, and one of the most common sources of leaks.
From the ground or a ladder, look for flashing that is loose, bent, rusted, or pulling away from the surface it should seal. Check the base of chimneys, around plumbing vents, and along valleys. For example, rust streaks below a chimney often mean the flashing has failed and water is getting behind it.
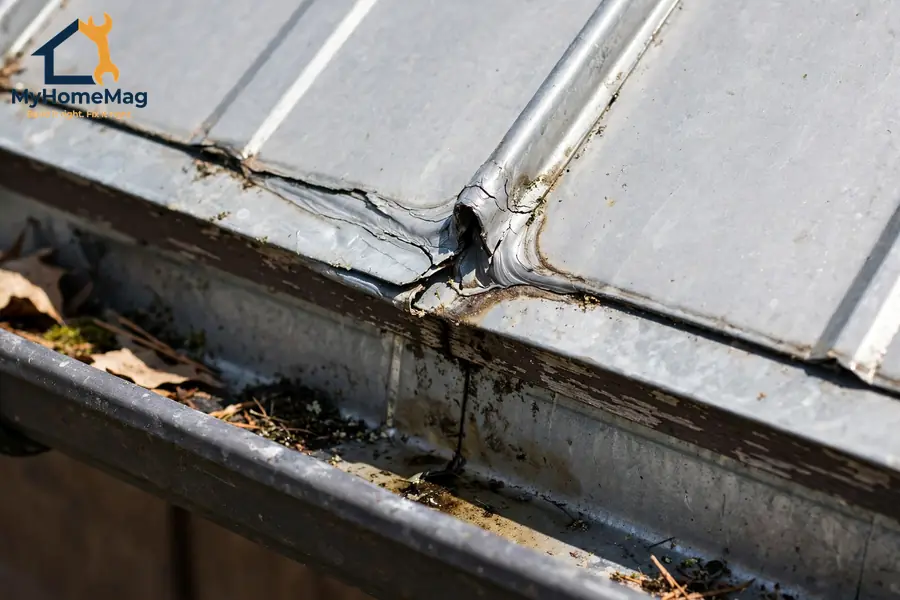
Check 3: Gutters and Downspouts
Gutters are part of the roof system, not a separate chore. When they clog or sag, water overflows, soaks the fascia, and can back up under the shingles at the eaves.
Check gutters for leaves, twigs, and granules from the shingles. A large amount of granules in a gutter can mean the shingles are wearing out. Look for sagging sections, joints that leak, and downspouts that are disconnected or blocked. Moreover, follow each downspout to the ground: water should drain well away from the foundation, not pool beside the house.
Check 4: The Attic and Ceilings Inside
The attic often tells the truth about a roof before any other part of the house does. Go into the attic on a dry day, with a flashlight, and look carefully.
Check for water stains on the underside of the roof deck, on rafters, and on insulation. Look for damp spots, mold, and a musty smell, all of which can mean a slow leak. On a bright day, look for daylight coming through the roof; small points of light can mean gaps, missing shingles, or damaged flashing above.
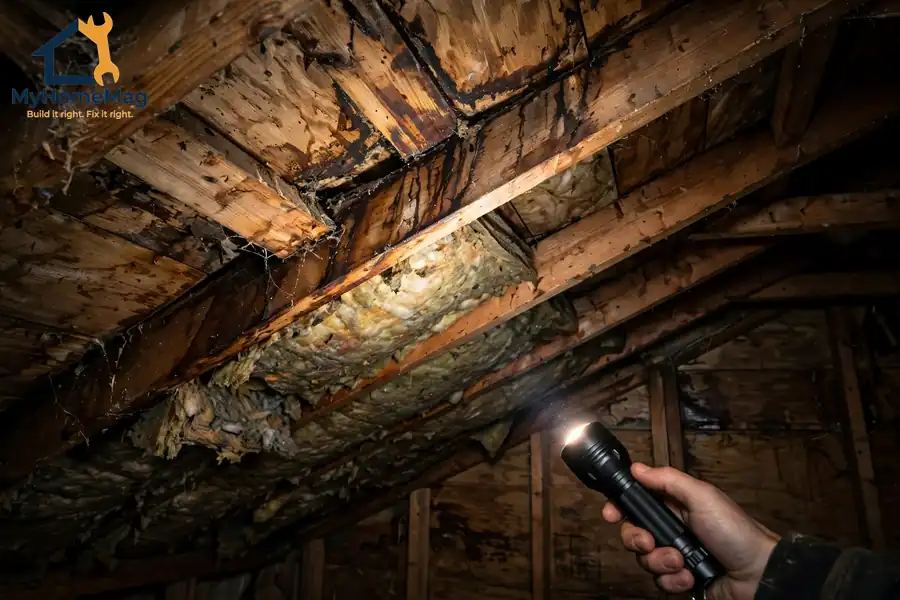
If you find mold, extensive staining, or rotted wood, do not try to clean or repair it alone. A roofer, and sometimes a mold professional, should assess the extent of the problem first.
Check 5: Ventilation, Soffits, and Moisture
Good ventilation lets the attic breathe. Without it, heat and moisture build up, shingles age faster, and mold can grow on the underside of the roof.
Check soffit vents under the eaves for blockages, damage, or paint sealing them shut. Look at ridge vents and other roof vents from the ground for damage or missing covers. Inside the attic, look for signs of trapped moisture, such as condensation, rust on nails, or damp wood.
What a Professional Roof Inspection Covers
A professional inspection goes further than a homeowner check. A roofer will usually walk the roof, where it is safe to do so, and inspect the shingles, flashing, valleys, and penetrations up close. They will also check the attic, the ventilation, and the condition of the roof deck.
A professional inspection is especially valuable before buying a home, after a major storm, or when a roof is approaching the end of its expected life.
When to Call a Pro — and What It May Cost
Call a roofer promptly if you see active leaking, sagging, large areas of missing shingles, rotted decking, or damage after a storm. Also call a pro if you are unsure about roof safety, if the roof is steep or high, or if the attic shows mold or extensive staining.
The table below gives approximate US planning ranges only. These are not quotes, and actual prices vary by roof size, material, location, and the extent of the problem.
| Service | Approximate US planning range |
|---|---|
| Professional roof inspection | $150–$400, sometimes free with a repair quote |
| Minor shingle or flashing repair | $150–$600, depending on the area |
| Gutter cleaning (professional) | $100–$300 for a typical single-family home |
| Gutter repair or section replacement | $150–$600, depending on length and material |
| Attic ventilation repair | $300–$1,000, depending on the vents and access |
| Full roof replacement (for comparison) | $8,000–$20,000+ for asphalt, higher for metal, tile, or slate |
If a repair estimate seems very high, or if a contractor pressures you to replace the whole roof after a minor problem, get a second opinion. A written report and photos from a first inspection make that second opinion much easier to compare.
Keep a Simple Inspection Record
A short record turns a one-time check into a habit. After each inspection, note the date, the weather, and anything you found, even if the answer is ‘no problems.’ Keep photos with the same date, so you can compare the same roof slope over time.
A Practical Final Check Before You Finish
Before you put the ladder away, do one last walk around the house. Check that gutters are clear, downspouts are connected, and no tools or debris are left on the roof or in the yard. Look once more at any area you flagged, and write it down while it is fresh.
If everything looks sound, you are done until the next season or the next storm. If anything looks doubtful, book a professional inspection rather than waiting.
FAQs
How often should I use a roof inspection checklist?
Twice a year is a good rule: once in spring and once in fall, plus a quick check after any major storm. Older roofs, roofs in storm-prone areas, and roofs with a history of leaks may benefit from more frequent checks, but a twice-yearly routine catches most problems early.
Can I inspect my own roof safely?
Yes, for a basic inspection. Most of this checklist can be done from the ground, from a ladder at the eaves, and from inside the attic. Do not walk a steep, wet, icy, or damaged roof, and do not work near power lines. If you feel unsafe at any point, stop and call a professional roofer.
What are the most common problems found during a roof inspection?
Missing or cracked shingles, failed flashing around chimneys and vents, clogged or sagging gutters, and attic signs of leaks are the most common findings. Debris in valleys, poor ventilation, and moss growth are also frequent, especially on older or shaded roofs.
How do I know if a roof leak is urgent?
An active drip, a growing ceiling stain, sagging, or water in the attic after rain are urgent signs. Turn off power to any affected area if water is near electrical fittings, place a container to catch drips, and call a roofer promptly. A small, dry stain from an old leak is less urgent, but it should still be checked at the next inspection.
Does a roof inspection checklist work for all roof types?
The basic areas are the same for most roofs: surface, flashing, gutters, attic, and ventilation. However, the details differ. For example, metal roofs need checks for loose fasteners and rust, tile roofs need checks for cracked or slipped tiles, and flat roofs need checks for ponding water and membrane seams. Use this checklist as a starting point, and ask a roofer about material-specific checks for your roof.
How much does a professional roof inspection cost?
In the US, a professional inspection typically costs about $150 to $400 as a planning range, and some roofers offer a free inspection when you are also getting a repair quote. The exact price depends on roof size, slope, access, and whether you receive a written report with photos. Keep that report with your home records.
Related Guides
- MyHomeMag — practical home guides for every room.
- Exterior Home Improvement — more guides for your home’s exterior.
- Roof Replacement Cost: Materials, Warning Signs, and What to Ask a Roofer — what a full replacement may cost.
- When a repair is not enough: roof replacement costs — materials, warning signs, and questions to ask a roofer.