Your dryer runs, it gets warm, and the clothes come out — eventually. The problem is the “eventually”: a normal load that used to take 45 minutes now takes two full cycles, or the towels are still damp in the middle when the buzzer sounds. A dryer that takes too long to dry is frustrating in a different way from a dryer that never heats at all, because the machine seems to be working. It is, in a sense. It is just working against blocked airflow.
That distinction matters, because it changes where to look. If your dryer produces no heat at all, that is a different fault — a tripped breaker, a blown thermal fuse, a failed heating element or igniter — and it is covered in our companion guide on a dryer not heating. This guide covers the other case: the dryer heats, the drum turns, but drying takes far too long. In almost every case, the cause is airflow: moist air cannot get out of the drum fast enough, so the clothes stay damp no matter how long the cycle runs.
The checks below work in order, from the free ones first. Most slow-drying dryers are fixed in the first three checks, without a part or a visit.
How Drying Actually Works
A dryer does not dry clothes by heat alone. It dries them by moving hot, dry air through the drum and carrying the moisture away. Three things have to work together: heat, tumbling, and airflow. The drum turns the clothes so every piece meets the warm air, and the blower pushes that air through the drum and out through the vent to the outside of the house.
When airflow drops, the air inside the drum turns humid and stays humid. The clothes cannot give up their moisture into air that is already full of it, so drying slows to a crawl — even though the heating element or burner is working perfectly. That is why a blocked vent can make a healthy dryer look broken, and why clearing the vent often fixes the problem in one go.
It also explains why the dryer feels hot on the outside when it is drying slowly. The heat has nowhere to go, so it builds up inside the machine instead of leaving with the damp air. Over time, that overheating can trip the thermal fuse — and then the dryer stops heating entirely. In other words, slow drying is not just an annoyance. Left alone, it can turn into a no-heat fault, and it is a fire risk while lint keeps building up.
Common Causes at a Glance
| Cause | What you may notice | First safe check |
| Clogged lint filter | Drying time creeps up over weeks | Clean and wash the filter |
| Blocked or crushed vent hose | Dryer hot outside, weak air at the outside cap | Check the hose and the outside cap |
| Overloaded drum | Centre of the load still damp, clothes tangled | Dry a smaller, sorted load |
| Dirty moisture sensor bars | Dryer stops early, or runs far too long | Clean the sensor bars with vinegar |
| Wrong cycle or heat setting | Clothes damp on one setting only | Try Timed Dry on High Heat |
| Lint inside the machine | Musty smell, lint around the door seal | Clean the door area; inside is a technician job |
| Failing cycling thermostat | Heat comes and goes during the cycle | Note the pattern, then call a technician |
This table is a starting point, not a diagnosis. The checks below follow the same order.
Safety First: Before You Touch Anything
Slow drying is usually a simple fix, but a dryer still mixes heat, mains electricity, and — on gas models — flammable gas. Use this short checklist before any check below:
- Unplug an electric dryer before removing any panel or touching wiring, the heating element, or the thermal fuse. On a gas dryer, unplug it and turn the gas shut-off valve off before removing a panel.
- Never bypass a thermal fuse, a high-limit thermostat, or any safety device to “test” the dryer. Those parts shut the heat off for a reason, and bypassing them is a fire risk.
- If you smell gas, stop, do not switch anything electrical on or off, leave the house, and call your gas utility or emergency services from outside. Do not try to find a gas leak yourself.
- Never run a dryer with the vent disconnected into the room. The hot, damp air and lint need to go outside, and a disconnected vent is a fire and moisture risk.
- Let the dryer cool before you reach inside it. The drum and the vent can stay hot after a cycle.
- If you see sparking, scorch marks, or damaged wiring, stop, unplug the unit, and call a professional.
Check 1: The Lint Filter — the Cheapest Fix First
Start with the lint filter, because it is the most common cause of slow drying and it costs nothing to fix. Every load leaves lint on the filter, and even a thin layer slows the air moving through the drum. Over weeks, that layer thickens, drying times creep up, and most owners blame the dryer itself before they blame the filter.
First, pull the filter out and clean it thoroughly after every load — not just when it looks full. Then hold it up to the light. If you cannot see light through the mesh, wash it with warm soapy water and a soft brush. Fabric softener and dryer sheets leave a waxy coating on the mesh that blocks airflow even when the filter looks clean, and that coating is invisible until you test it this way. Let the filter dry fully before you put it back.

Next, run one test load with a clean filter: a small load of light clothes, on Timed Dry at High Heat. If it dries in a normal time, the filter was the problem, and the habit to keep is simple — clean it after every load, wash it every few months, and never run the dryer without it in place. Running without a filter lets lint straight into the vent and the machine, which is exactly how a small problem becomes a blocked vent.
Check 2: The Vent Hose and the Outside Cap
If a clean filter does not fix it, the blockage is further along the vent. Lint builds up in the vent hose behind the dryer, in long vent runs through walls, and in the outside vent cap — and any one of those can choke the airflow enough to double drying times.
First, check the vent hose behind the dryer. Pull the dryer out just enough to see it, and look for a hose that is kinked, crushed flat against the wall, or sagging in a loop. A flexible foil or plastic hose is easily crushed when the dryer is pushed back, and a crushed section can cut airflow by more than half. The hose should run in a smooth, short path to the outside, with no sharp bends. A rigid metal vent is the safer replacement if yours is damaged, and it is worth asking a technician about if you are replacing the hose anyway.
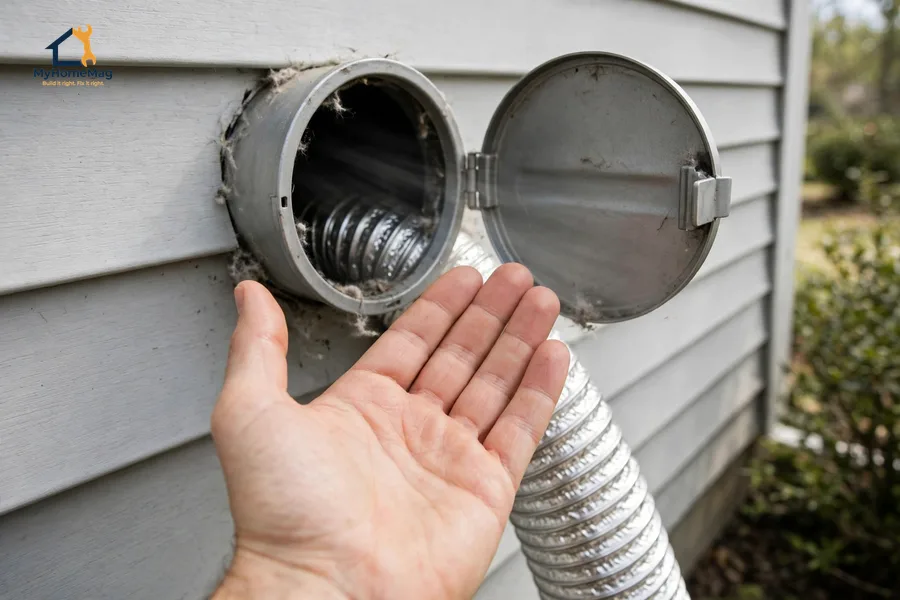
Then check the outside vent cap while the dryer runs on a no-heat or air-fluff cycle. You should feel a strong flow of air, and the cap flap should open fully. If the flow is weak, or the flap barely moves, the vent is blocked somewhere along its length. Look at the cap itself too: lint, a bird’s nest, or a stuck flap can block it from the outside, and that is often the easiest blockage to clear.
If the airflow is weak and the hose and cap look clear, the blockage is inside a long vent run. Lint trapped there is a professional vent-cleaning job, not a DIY snake job — pushing a brush through from the wrong end can pack the lint tighter. A professional cleaning usually takes under an hour, and it is the fix our companion guide on dryer vent cleaning cost covers in detail.
Check 3: The Load — Size, Sorting, and Spin
Sometimes the dryer is fine and the load is the problem. A dryer can only dry what the air can reach, and an overloaded drum stops the clothes from tumbling freely. The pieces in the centre stay pressed together, the warm air passes around the outside of the ball, and the middle comes out damp while the edges are dry.
Try a test load that is half the size you usually dry, with similar fabrics together — towels with towels, light clothes with light clothes. Heavy and light pieces dry at different speeds, so a mixed load will always leave something damp. If the smaller, sorted load dries in a normal time, the dryer was never broken. The fix is to dry in two smaller loads, or to split heavy items from light ones.
Also check what the washer left behind. If the washer’s spin cycle is weak, clothes arrive at the dryer much wetter than they should be, and no dryer can make up for that in a normal cycle. If clothes come out of the washer dripping, or the washer leaves water in the drum, the problem may be in the washer, not the dryer — our guides on a washing machine not draining and water stuck in a washing machine cover those faults. As a quick test, run an extra spin cycle on a wet load before you dry it, and see whether drying time drops back to normal.
Check 4: The Moisture Sensor and the Cycle Settings
Modern dryers do not just run for a set time. On an automatic or sensor cycle, two metal sensor bars inside the drum measure how damp the clothes are, and the dryer stops — or keeps going — based on what they read. When those bars get coated with fabric softener residue, they misread the load. The dryer may stop far too early, leaving clothes damp, or run far longer than it needs to.
Find the sensor bars — two curved metal strips, usually just inside the door opening or on the back wall of the drum. Wipe them with a cloth dampened with a little white vinegar, then dry them with a clean cloth. Do this every few months, and always after a period of heavy dryer-sheet use. It takes a minute, and it is one of the most overlooked fixes for slow drying.
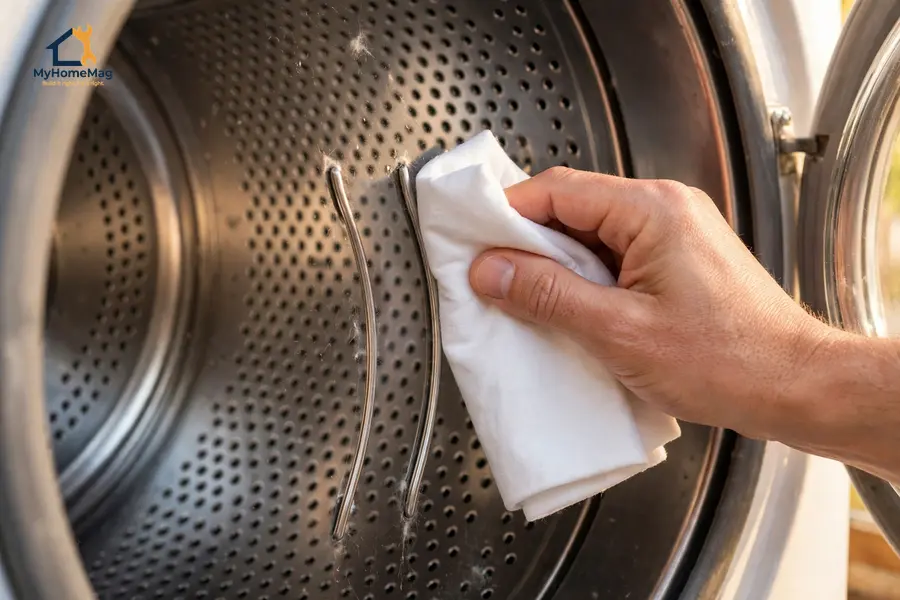
Then test the cycle itself. Run the same load on Timed Dry at High Heat, with a time you choose — 40 minutes for a normal load, for example. If it dries properly on Timed Dry but not on an automatic cycle, the sensor or the cycle is the problem, and the sensor clean above is the first fix. If it is slow on every setting, the problem is airflow or heat, and the checks above and below are where to look. And if it only dries slowly on a low-heat or delicate setting, try a higher heat setting for sturdy fabrics — some loads simply need more heat than the setting you chose.
Check 5: Heat That Comes and Goes
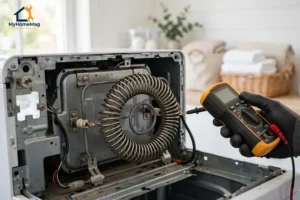
A dryer that heats but dries slowly can also have a heat problem that is easy to miss: the heat starts, then stops, then starts again. The clothes get warm, then cool, then warm again, and the total drying time stretches out. That pattern points to the cycling thermostat — the part that turns the heat on and off to hold the drum at the right temperature — or to a heating element that is failing in stages.
You cannot safely test either part yourself without opening the machine and working near high-voltage wiring, so this check is about observing, not fixing. Note the pattern carefully: does the dryer feel hot at the start of the cycle and then go cold halfway through? Does it heat on one load and not the next? Does it dry a small load fine but fail on a large one? That pattern is exactly what a technician needs to hear, and it separates a thermostat fault from a vent fault — a vent fault makes drying slow from the very start, on every load, while a thermostat fault makes the heat unreliable.
One reset is worth trying for a control glitch. Unplug the dryer for a full minute — and on a gas dryer, turn the gas off first — then plug it back in and run a short Timed Dry cycle on High Heat with a small load. If it dries normally, the control board likely glitched. If the same slow drying returns, do not keep resetting it. Call a technician with the pattern you saw.
Check 6: Lint Inside the Machine and When to Call a Pro
Lint does not only collect in the filter and the vent. Some of it gets past the filter and builds up inside the machine, around the blower and the drum seals. You may notice a musty smell, lint collecting around the door seal, or a faint burning smell when the dryer runs. That last sign matters: lint near a heating element is a fire risk, and it should not be ignored.
Clean what you can reach safely — the door seal, the inside of the door, and the area around the filter housing — with the dryer unplugged and cool. Do not remove panels to reach lint inside the machine. That is a technician job, and it is often done in the same visit as a vent cleaning.
Call a professional if any of these apply: the vent airflow at the outside cap is still weak after the hose and cap are clear; the dryer overheats, trips the thermal fuse, or smells of burning; the heat comes and goes in the pattern in Check 5; or the dryer is over ten years old and slow drying arrived together with noises, vibration, or a burning smell. Tell the technician what you have already checked — clean filter, vent hose, outside cap, load size, sensor clean — so the visit starts with the parts, not with the free checks.
What Repairs Cost, and When Replacement Makes More Sense
Treat every figure as an approximate US planning range, not a quote, and get a written estimate before authorising work.
| Repair | Approximate planning range (installed) |
| Professional vent cleaning | $100 to $200 |
| Moisture sensor replacement | $120 to $200 |
| Cycling thermostat | $120 to $200 |
| Heating element (electric) | $150 to $300 |
| Blower motor | $200 to $400 |
| Control board | $300 to $500 |
Age matters as much as price. On a dryer under ten years old, a vent cleaning, a sensor, or a thermostat is usually worth fixing — and the vent cleaning is maintenance every dryer needs anyway. On a machine over twelve years old, or when two expensive parts fail at once, the repair can cost half the price of a new dryer. If a technician quotes more than half the cost of a comparable new dryer, ask for the numbers in writing before deciding. A new dryer that dries properly also uses less energy than an old one fighting a blocked vent, so factor the running cost in as well.
Preventing Slow Drying in the Future
Most slow drying is preventable with three habits. Clean the lint filter after every load, and wash it with soapy water every few months so softener residue does not block the mesh. Check the vent hose once a year for kinks, crushing, or sagging, and have the full vent run cleaned professionally every year or two — more often if you dry heavy loads or pet bedding. Finally, do not overload the drum: a packed drum blocks airflow, overheats the dryer, and trips the thermal fuse, which is exactly the failure that turns slow drying into no heating at all.
Your Quick Plan
If the dryer heats but takes too long to dry, work through this order and stop as soon as drying returns to normal:
- Clean the lint filter, wash it if light will not pass through it, and run a small test load.
- Check the vent hose for kinks or crushing, and feel for strong airflow at the outside cap.
- Dry a smaller, sorted load, and check whether the washer is leaving clothes too wet.
- Clean the moisture sensor bars with vinegar, and test the load on Timed Dry at High Heat.
- Note whether the heat comes and goes — that pattern points to the thermostat, and it is a technician job.
- Try one unplug-and-reset, then retry once. If drying is still slow, call a technician with the pattern you saw.
If the dryer dries normally after any step, run one full cycle with a normal load to confirm the fix. If it still takes two or three cycles, call a technician with the dryer type (electric or gas), the airflow you felt at the outside cap, and the checks you already tried.
Frequently Asked Questions
Why does my dryer take two cycles to dry clothes?
A dryer takes too long to dry when moist air cannot leave the drum fast enough — almost always a clogged lint filter, a blocked or crushed vent, or an overloaded drum. Clean the filter, check the vent hose and the outside cap for airflow, and try a smaller load. If airflow is strong and it is still slow on every setting, the moisture sensor or the cycling thermostat may be at fault.
Can a clogged vent make a dryer take longer to dry?
Yes. A clogged vent is the most common cause of slow drying. When airflow drops, the air inside the drum stays humid, the clothes cannot give up their moisture, and the dryer overheats. Clean the lint filter and check the outside cap for airflow first; a blockage inside a long vent run is a professional cleaning job.
Why is my dryer hot but not drying clothes?
If the dryer feels hot on the outside but the clothes stay damp, the heat is building up inside the machine instead of leaving with the damp air — a classic sign of blocked airflow. Check the vent hose and the outside cap before you blame the heating element. A dryer that is hot but not drying is also the one most at risk of tripping its thermal fuse, so do not keep running it.
Should I use Timed Dry or a sensor cycle?
Use Timed Dry to test whether the dryer itself is at fault: if a load dries on Timed Dry at High Heat but not on an automatic cycle, the moisture sensor is the likely problem — clean the sensor bars with vinegar. For everyday drying, a sensor cycle is more efficient once the sensor is clean, because it stops when the clothes are actually dry.
When should I call a professional for a slow dryer?
Call a professional if the airflow at the outside cap is still weak after the hose and cap are clear, if the dryer overheats or smells of burning, or if the heat comes and goes during the cycle. Those point to a blocked vent run, a failing thermostat, or lint inside the machine — all technician jobs. Tell the technician what you have already checked so the visit starts with the parts, not the free checks.
Related Guides
- MyHomeMag
- Appliance Guides
- Dryer Not Heating? Electric and Gas Checks to Try First
- Washing Machine Not Draining? Filter, Pump, and Hose Checks
- Water Stuck in Washing Machine? Why It Won’t Spin and What to Check
- Washing Machine Leaking: Find the Source, Stop the Water, and Fix It Safely
- Washing Machine Shaking Violently? Level It and Stop the Banging